Spiro Mode in Inkscape Makes a Perfect Curve
If you ever tried to make a perfect curve in Illustrator, this post is for you
I definitely don’t mean to be so negative about Adobe. It does some wonderful things. Currently I’ve been learning about Adobe’s digital publishing suite. No other software that I’ve found so far is doing something similar and it gives designers the ability of publishing to the iPad without coding. You can’t beat that. I’m looking forward to getting my hands on the new CS6 and seeing what has been added. They did go back for CS6 and reengineer processes like Live Trace, so we have major improvements to look forward to. Until then, I still have work to do and I like to choose the right tool that is going to give me the best result in the quickest time with the smallest learning curve. For those of you that hate struggling with the pen tool in Illustrator (there are many designers who avoid that darn pen tool), there’s a solution for you that’s pretty painless and free—Inkscape Spiro Mode.
I created a video of this for you to watch on Vimeo. Check it out. I’m also including a step by step here that you can use as reference.
-

Pen Tool Icon - 1. Select the ‘Pen Tool’
The first step is creating a path with the pen tool. The pen is located in the tools palette on the left of the screen just like Illustrator.
-
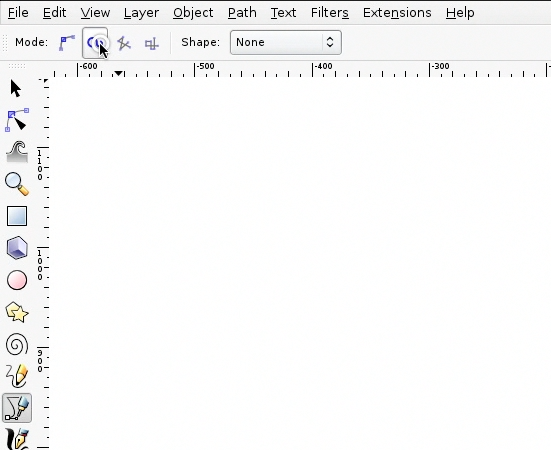
Select Spiro Mode
2. Select ‘Spiro Mode’
Underneath the top menu there are preference that pop up for each tool you select. Depending on the tool, different parameters will appear. I like to refer to that as the dashboard. When the ‘Pen Tool’ is selected, notice that there are different shapes in the top left of the dashboard. The default is the leftmost icon and that’s for a regular bezier line—exactly what you are used to in Illustrator. Next to that there is something called ‘Spiro Mode’. That is the mode you’ll want to select to make your perfect curve.
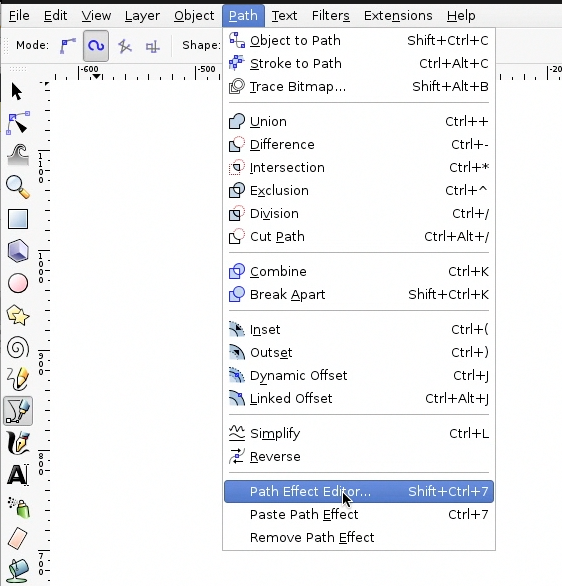
2. Show the ‘Path Effect Editor’ dialogue
In order to see that this is an effect, you’ll want to show the ‘Path Effect Editor’ dialogue. Inkscape’s equivalent to palettes are dialogues. Unlike Adobe products, you’ll notice that in Inkscape there is no ‘Window’ drop down option in the main menu. In Adobe, ‘Window’ is where all the palettes are located. In Inkscape, the dialogues (palettes) are located in the menu item it’s associated with. So for the ‘Path Effect Editor’, you’ll Navigate to ‘Path/Path Effect Editor’ in the main menu up top.
3. Draw a path
Once you have the ‘Path Effect Editor’ dialogue open, you’re pen tool selected, and your pen is in ‘Spiro Mode’; you’re ready to draft a path. Start clicking like you would in Illustrator. Once you are finished with the pat. double click to finish the job. You’ll see that the software is taking over in ‘Spiro Mode’ and is making perfect curves. If you want to adjust the curves, select the ‘Node Editing’ tool (it’s what we call the ‘Direct Select’ tool in Illustrator) and move the points individually. You’ll see when you do that, the computer is replotting your perfect curves every time. As a word of caution, if you move to fast or to far when moving a node (anchor point), you might get a crazy squiggle on the screen. If this happens, just keep the mouse button pressed down and start to slowly move the node back to it’s original position, the effect should correct itself.
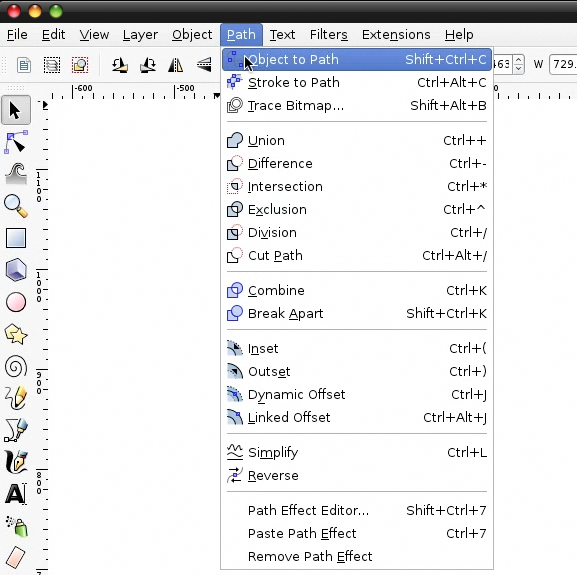
4. Commit Effect to Path
Once you’re happy with the result, it’s time to make the shape ready for Illustrator. If you saved the file now as an SVG and tried to open it in Illustrator, you’ll get an error message. This is because Illustrator doesn’t have a spiro effect and therefore cannot read the information. In order to make the vector info read properly, you’ll have to commit the effect. In Illustrator this is called ‘Expand Appearance.’ In Inkscape the process is called ‘Object to Path’ and it’s located in the Path Menu (‘Path/Object to Path’). With the shape selected, go to ‘Path/Object to Path’ and you’ll notice that the spiro effect listed in the ‘Effect Editor’ dialogue disappears.
5. Save as a SVG File
When saving a file, .SVG is the best format. Illustrator will have no problem reading it.
6. Open in Illustrator
And that’s it. If you want to learn ‘Triangle In’, then watch the vimeo video. I hope this is helpful and will get you making lots of swirls!


