3D printing + Blender = fancy DIY bike camera
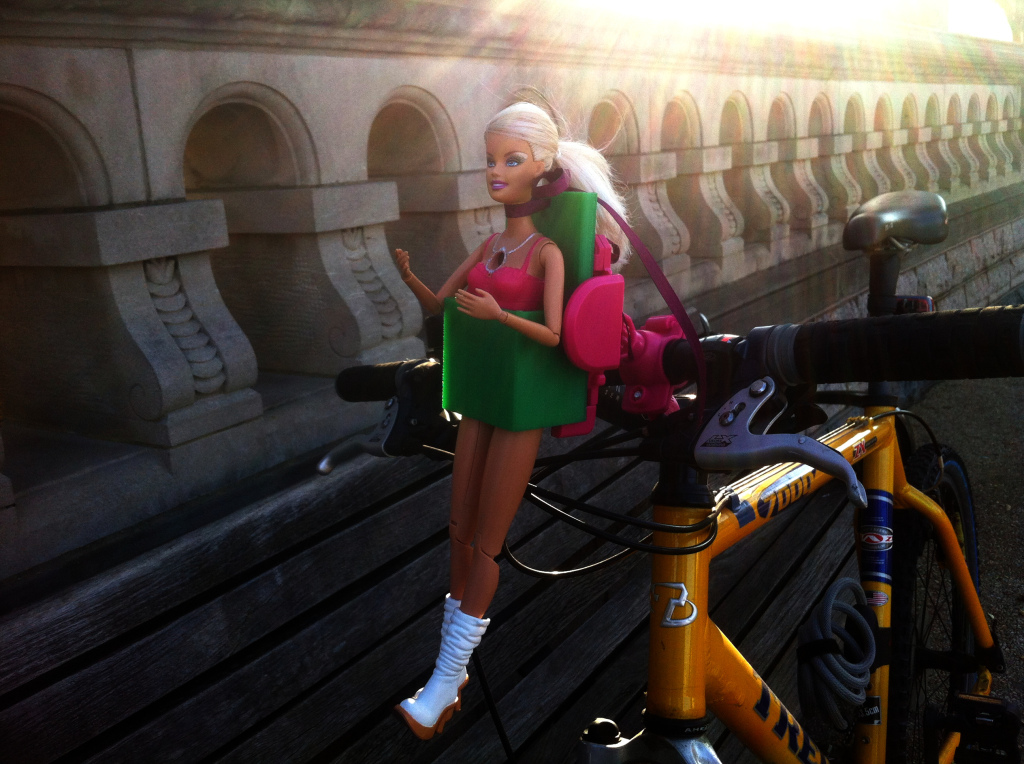
Yesterday I hopped out of bed with purpose. I was getting up early to test my new bike camera. In the past couple weeks, I’ve been learning to make and print in 3D using Blender and Blender Cloud. For my first project, I gave myself something easy to make so that I could focus on working on scale and how to set up the file. The end product is a stylish DIY GoPro camera for my bike.
It all starts in a thrift shop
So where did I get the idea to make this contraption? Commuting to work by bike, I see tons of fellow bikers using some camera-type device for their travels to work. It’s interesting that people would record such mundane trips and I wonder if they save all these commuting memories. That’s an easier conclusion than thinking that many people wear them just in case of unexpected litigation. Bikers aren’t treated wonderfully in the city, but I guess all these video-clad bikers is the result of living in a city where everyone is a lawyer—come prepared.
Last year I was in a thrift store outside of town and came across a Barbie that actually doubles as a video camera for only 99¢. Her camera lens forms a cavernous hole in her chest and she’s equipped with an LCD screen on her back for viewing your masterpieces. Barbie dresses up her chest stoma with decorative jewelry. ‘What a better camera on your bike than Barbie’, I thought. She’s an arrow-dynamic goddess that trumps any car’s hood ornament from the 40s. Next, it was just figuring out how to attach her to the bike.

Blender, Blender Cloud, and MLK’s Digital Commons
Months past without making any progress with the Barbie/GoPro idea. I came up with notions, like attaching her to the bike with neoprene and velcro. I easily abandoned many solutions because either the idea would get too complicated or require expensive materials.
While camera ideas were circling in my head, I started learning to use Blender for drafting in 3D. Serendipitously my local library started a digital department that specialized in 3D printing call the Digital Commons. They have classes educating people on drafting and printing in 3D. With a affordable printing at the Commons (only 5¢/gram) and classes walking you through set up, it was a great option for making a camera mount for my bike.

I used my Blender Cloud subscription to learn about the tools needed for checking your model before printing and how to draft to scale. I was surprised how easy it was to create and file and properly export. Blender Cloud was a great resource and taking the Digital Commons classes set me in the right direction for getting started.
The design
The the design is comprised of three parts—the video Barbie, a mobile phone clamp that I purchased at a dollar store, and a 3D printed Barbie holder. The total price for all parts was a little over eight dollars.

So the design for the Barbie holder isn’t earth shattering. It’s basically a box that holds Barbie, making her capable of attaching to the mobile phone clamp. I made the width and height of the design comparable to the dimensions of my phone. I also included holes at the top of the box to stabilize Barbie to the holder by her neck with ribbon.

It was a great first exercise of getting myself acquainted with the process of designing and printing a 3D image. I’m looking to creating more elaborate stuff.

Video quality
The video quality is interesting because it reminds me of an old 8mm camera. The imagery is contrasty, small in size, and extremely compressed. But for a $1 video camera in the shape of a blonde bombshell, it makes me a little more forgiving of the overall imagery.
Special thanks
Thanks goes out to Blender Cloud, MLK Library, the Digital Commons and Erika at the Digital Commons. I’m thankful to have access to all these resources, services, support! Keep up the great work:)

